Channel Program integrates seamlessly with Autotask PSA to sync customer company data.
Follow the steps below to complete the integration.
- Available data sync options
- Configuring Autotask User
- Autotask Region
- Installing integration in Channel Program
Review available data sync options
The integration supports a one-way data sync from Autotask to Channel Program. The specific data that will sync depends on the selected sync options. Before proceeding, review the available data sync settings to ensure they meet your requirements.
RECOMMENDATION: To ensure all relevant customer profile details are synced, enable both Active Customers and Active Customer Contracts.
|
Sync Type |
Sync Active Customers |
|
Sync Conditions |
|
|
Data Synced |
|
|
Triggering a Sync |
Data will sync under the following conditions
|
|
Sync Type |
Sync Active Customer Contracts |
|
Sync Conditions |
|
|
Data Synced |
Customer record
Contract record
|
|
Triggering a Sync |
Data will sync under the following conditions
|
Configure a new Autotask user
While you can use an existing Autotask user for the integration, it's recommended to create a dedicated user for Channel Program to ensure seamless operation.
- Login as an administrator to your Autotask dashboard.
- From the navigation menu, mouse over the 3-bar menu item.
- Navigate to Admin, > Account Settings & Users.

- Expand Resources/Users (HR), then click Resources/Users.

- Hover over the New menu and select New API User.

- Fill in the required details: Name & Email Address.
- Set the Security Level to API User (system).
- Generate a Username (Key) and a Password (Secret) < Copy these values and store them for securely for later use.
- Under API Tracking Identifier. Select Custom Integration, enter Channel Program – Integration as the Internal Integration Name.
- Copy the generated Tracking Identifier and save it along with the username (key) and password (secret).
- Click Save & Close.

Autotask Region
To complete the installation, it's essential to identify the correct region (zone) of your Autotask instance. While Autotask zones are interconnected and can redirect users to the correct zone, using the appropriate zone ensures optimal performance.
- Navigate to the Autotask API zones and WSDL versions
- Under the REST API section, expand Find your zone’s API URL for the REST API.
- Browse the list to locate your region (e.g., America East 3).
- Record the corresponding Zone name (API URL), as you’ll need it for the next steps.
If you’re unable to find your region or are unsure which zone to use, refer to the guide on Querying user zone information via the REST API for further assistance.
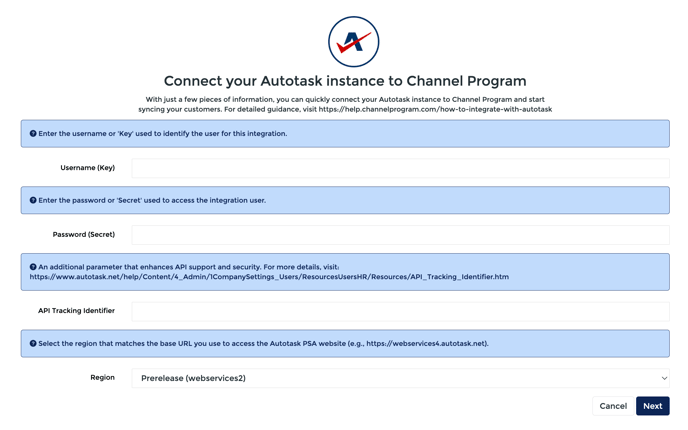
Installing the Autotask integration in Channel Program
With the necessary details and configuration from Autotask in place, you can now proceed to complete the integration installation in Channel Program.
- Sign into Channel Program as a company administrator.
- From the side navigation click Integrations.
- Find the Autotask integration card and click View.
- Click Install for the preferred data sync, to start the installation process.
- On the installation screen, enter the following details:
- Username (key) – Use the username (key) generated earlier.
- Password (Secret) – Enter the password (secret) generated earlier.
- API Tracking Identifier – Provide the API tracking identifier saved earlier.
- Region – Select the application region for your Autotask instance.
- Click Next.
NOTE: If you chose to install the Active Customer Contracts sync, it’s recommended to also enable Active Customers. This ensures that the customer profile is synced with all relevant information. To install Active Customers, simply click Install.
Congratulations! The integration has been successfully installed, and data sync will begin shortly. To confirm that the data is syncing, go to Manage Clients under NaviStack.
For ongoing management of your integration, please refer to How to manage integrations.